


Improving Guitar and Piano Playing Speed
One of the questions most often asked of me is "How do I improve my piano or guitar playing speed?". Just yesterday I taught a music lesson on this subject so my mind is fresh. Here are my tips for getting your fingers to fly.
Tip Number 1: Regular Practice

Some people are naturally gifted with speed. I believe that genetics plays a part in how fast people can play their instruments. I also think that what you did earlier in life, such as typing on a computer keyboard, or something else that involves your fingers, may help once you start playing a musical instrument. But my number one tip is to set up a schedule and stick to it. The most important part is practicing several days a week, not necessarily for a long time each practice session, but making it regular. I usually recommend practicing five days a week and taking two days off. Taking a day or two off each week lets your brain and body rest.
How long should you practice? This is up to you. Professional musicians need to practice more, amateurs less. Unless you're a professional musician, the amount of time you spend each practice session is less important than establishing a multiple-day-per-week routine. That means you could practice as little as five or ten minutes each day and make progress. You'll make more progress and be able to deal with a bigger repertory of music if you set aside more time of course. But when it comes to simply improving speed, the number of days you practice each week will be more important than how long you practice each time.
One note of caution: Do not overdo it! If you practice the same thing over and over, day in and day out, you take the risk of developing a repetitive stress injury. Do not perform the same exercise scores of times every day! Also, if you practice for more than an hour a day, take a several-minute break every hour. If you injure yourself so you can't play, any speed you've developed will likely evaporate while you rest. Do everything in balance. Too much of even a good thing can be a bad thing, right?
Tip 2: Practice the Scales for Your Particular Genre of Music
Pick scales that fit your particular genre of music. If you're a classical player, practice the major scale and the three typical forms of minor: natural, harmonic, and melodic. (The melodic scale I'm thinking of here is the one that raises the sixth and seventh degrees when ascending and lowers them when descending. I'm not referring here to the so-called jazz melodic minor which keeps the sixth and seventh degrees raised whether ascending or descending. To avoid confusion, I call this scale jazz minor.) If you're a jazz player practice every scale you can: major, minor, modes of major, modes of minor, minor pentatonic, blues, major pentatonic, etc. If you're a country player, you probably want to do major and minor pentatonic, major, and blues. If you're a blues player . . . well, you get the idea, right? If you've got lots of scales to practice, rotate them. Do certain ones on Monday, different ones on Tuesdays, etc.
Tip 3: Use a Metronome
At least some of the time that you practice scales, or any exercise related to developing speed, use a metronome. Each practice session, set the metronome for a comfortable speed and gradually set it one notch higher until you reach the limit of clean playing speed. Don't try to repeatedly play scales at speeds that result in sloppy playing. If you do, you will just be practicing your mistakes. Your goal should be to play cleanly with as few mistakes as possible. Be conservative, especially at first. At the end of your practice session make a note of the top speed for each scale, exercise, or piece of music. Then, at your next practice session start at this speed and practice. Set it one notch higher and see if you can still play cleanly. If you can, set the metronome at the next highest speed. Repeat this till you reach your limit of clean speed. Make a note of the speed and repeat this whole process at your next practice session.
Tip 4: Log Your Progress

Each day that you practice scales or other velocity-related exercises, keep a log of your progress. Write down the name of each scale or exercise along with the top clean speed. If you're doing things right you will see your speed increase over time. You may increase your speed rather dramatically at first, but later find that progress comes more slowly. This is normal. We reach plateaus as we get closer and closer to the limits of our genetic make-up and other limiting factors.
Tip 5: Vary the Rhythm
Whatever type of scale or exercise you're practicing, play it with various rhythms. For each pair of notes, use even rhythms, such as eighth notes. Then use something uneven, such as a dotted eighth note followed by a sixteenth or a shuffle triplet rhythm: long/short/long/short, etc. The idea is that you play fast every other note and give yourself a break on the longer rhythm of the uneven pairs. You might even try practicing pairs of notes as a doubled-dotted eighth note followed by a thirty-second note. See the examples below for ideas.

Tip 6: Vary the Articulation
Play scales using staccato, legato, staccato/legato pairs, loud/soft pairs, etc. See the examples below for ideas.

Tip 7a: Guitarists, Vary the Plucking Method
If you're a guitarist, or play an instrument where you can pluck or produce sound using various methods, practice the ones you will use when you perform. For example, if I'm fingerpicking, I'll pluck by alternating index and middle fingers, then index and ring, then thumb and index, etc. If I'm using a pick, I practice alternative picking, just using downstrokes, downstroke/downstroke/upstroke or downstroke/upstroke/upstroke for triplets.

Tip 7b: Keyboardists, Vary the Fingering and Direction
Keyboardists, play scales with various fingerings. Play scales right hand only, then left hand only, both hands, ascending and descending. Then play them in parallel motion followed by contrary motion. As a right-hander, I sometimes practice more times with my left hand than my right, attempting to make them more equal.

Tip 8: Analyze Your Body
Analyze how you're using your fingers, hands, arms, head, shoulders, torso, legs, feet - every part of your body. Are you using them efficiently, without excessive tension? Is your body in a balanced, comfortable position? How are you breathing? Is it regular and natural? The classical guitar pedagogue Charles Duncan in his seminal book, "The Art of Classical Guitar Playing", distinguishes between functional and dysfunctional tension. Developing speed depends on efficient movements. Analyze your movements to make them as efficient as possible.
Tip 9: Play One-Octave, Two-Octave, or Even Three-Octave Scales
At first you might want to practice one-octave scales. Once you're comfortable with them, progress to two-octave versions. Ultimately, practice three-octave or even larger scales.
Tip 10: Practice in Tidbits
Play scales or other exercises, or trouble spots in the literature you're working on, by first playing one note, then that note plus the next, then those two notes plus the third, etc. Work on small chunks like this, gradually increasing to bigger and bigger chunks, each time trying to play as fast and cleanly as possible. If you start making mistakes in a particular section, practice just that spot and work it in the same way: one note, then two, then three. Once that spot is going well, expand forwards or backwards by one or two notes and repeat the same process. This is an excellent technique to work out difficult spots. It is like eating a big meal in small bites.

One of my favorite stories to tell my young students when they're confronted with learning something difficult is to tell them the story of "Iron John". (I probably have this story all wrong, but the gist of it is correct.) Iron John is walking one day on his way somewhere important, when he runs into a vast pool of water. There is no way around the pool. He wants to bail out the water into a hole nearby, but all he has is a small spoon. Despite the difficulty of his predicament he sets about bailing the water out of the pool into the hole, spoonful by spoonful. It takes a long time but because he persists and works one spoon at a time, he eventually empties the pool so he can successfully return to his journey.
Developing speed and solving pesky difficult spots in music can both benefit from this spoon-by-spoon approach. If you break a big task into smaller bites, it can be completed. It will take time, but with persistence it can be solved.
Tip 11: Start Slowly and Warm Up Gradually
A physical therapist I know has told me on several occasions that it may not be necessary to warm up if you start slowly and gradually increase the speed. Slow practice is also good for establishing precision. If you start too fast you may make mistakes. The brain will assume that the mistakes are correct and will remember them, establishing a habit of making mistakes. It is better to practice slowly enough that there are no mistakes and then repeating this. You want to develop a habit of playing correctly. Speed is not generally considered good if it is full of mistakes. Almost anyone can play fast and sloppy. The goal is to develop speed and precision. Slow, correct practice will establish this. Fast, sloppy practice will not.
Try the half-speed/full-speed practice technique. In a book about practicing (the name of which I have sadly forgotten), the author promoted a technique that had some proven science behind it. The idea is to practice something at half-speed accurately, then practice it at full speed. Alternating these two speeds repeatedly can apparently speed up the learning process. (If I remember the book and author, I will post it here.)
Tip 12: Practice Patterns
My last tip (I could go on and on) involves the practice of patterns. It's a simple technique but it will develop speed over time. Keyboard players already have a ready resource: The many exercises written by Hanon. Hanon came up with scores of ways that the fingers can be used. Guitar players can simply make up a finger pattern and repeat it a few times. I've posted examples of both keyboard and guitar examples below. You can easily make up your own patterns. For guitar, I tend to practice one pattern on Monday, a different one on Tuesday, etc. As a piano player, I tend to stick with a Hanon pattern for a week or longer, played once a day, then graduate to the next one and stick with that for a few weeks, etc. But I see no reason why good piano players couldn't rotate a different Hanon exercise each day. Find out what works and go with it.
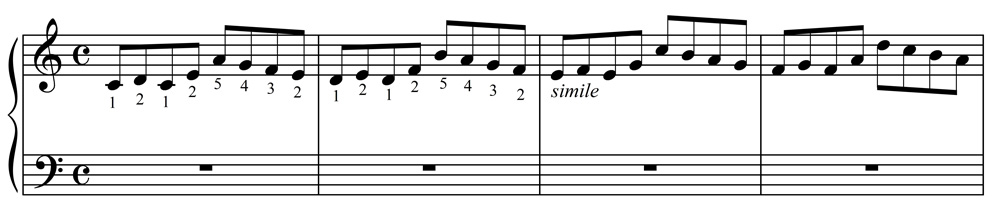
Hanon Keyboard Study for Right Hand - click here to download a pdf version for both hands
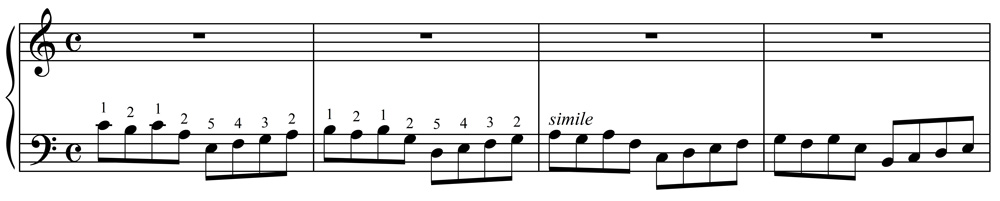
Hanon Keyboard Study for Left Hand - click here to download a pdf version for both hands
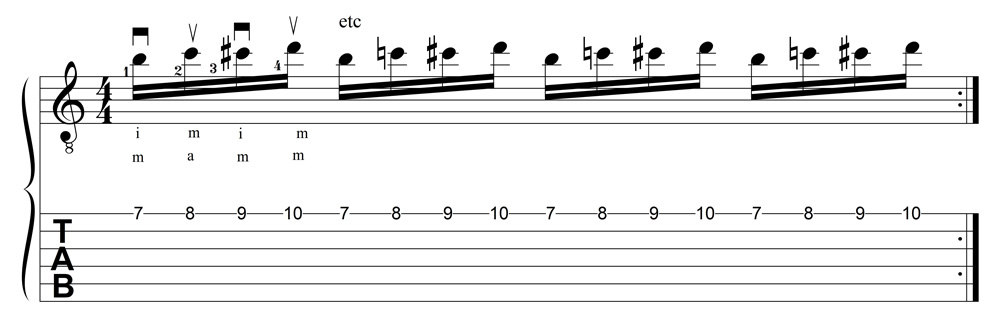
Coordination Study for Guitar - click here to download a pdf version
I hope you have found this article helpful.
Jeff Anvinson, owner/operator of JLA Music
Website and most graphics are created inhouse by Jeff Anvinson, Owner/Operator of JLA Music
Some graphics are purchased from Can Stock Photo, used by permission, and are Copyright
© Can Stock Photo
JLA Music takes care not to infringe on anyone's rights. Please contact us at jla@jlamusic.com if you have questions.
Copyright 2023 © Jeffrey L Anvinson