


Guitar Exercise: String Crossing Technique
Improving the skill of crossing strings, plucking one string, then another, then another, in succession can be a difficult technical problem on the guitar. One of my young students, Oliver, came up with an effective and challenging exercise to help develop this skill. It is aptly named String Crossing Technique and it is available below and in downloadable pdf format.
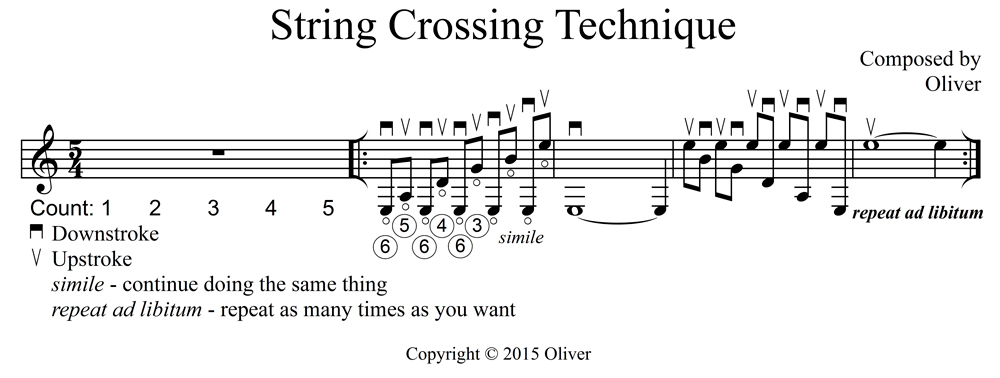
You'll notice that the exercise moves repeatedly through different open strings, while always returning to the sixth or first string. It uses alternate picking (downstroke, upstroke, downstroke, upstroke, etc) throughout. When you practice it you should be careful not to go too fast. If you cannot play it at a steady tempo without making mistakes, slow down. Find the speed at which you can play it flawlessly, then gradually increase the speed over days, weeks, or even months.
Here are some tips to help you get better at this exercise. There are at least three ways to pluck a string - using the fingers alone, the wrist alone, the forearm alone, or a combination of two or three.
Plucking using just the thumb and index finger has a limited range of motion - about the distance between two adjacent strings. It might be a good technique to use when you are crossing between two adjacent strings: the range of motion would naturally limit how far your pick would travel, making it more difficult to pluck at a greater distance. You'll no doubt make fewer mistakes crossing between adjacent strings because of this limitation.
Plucking using the wrist alone has a greater range of action, with a limit in distance about equal to the distance from the first string to the sixth string. You could use this kind of plucking when you pluck different strings that are separated by one of more strings, such as from the first to the fourth strings.
Using the forearm to pluck involves pivoting at the elbow, which allows for a large range of motion. This is usually used when strumming several strings at a time.
Making use of combinations of the above three techniques yields a plucking method greater than the sum of its parts, rendering all kinds of string crossings more accurate when used in the right combination.
When you do the following exercise, experiment with all three of these methods, either alone or in combination, to find which ones work best for you. You could also try to do the entire exercise using just wrist or forearm strumming to develop those techniques in isolation. (Strumming across a several string leap probably won't work using finger strumming alone due to its short range of motion.)
This exercise is focused on using a pick - not finger picking. Make note of the downstrum and upstrum symbols and follow them. You could reverse these to make the exercise even more challenging, but it would not be an effective use of a pick. Upstrums are used when the pick is moving from a lower string to a higher string. (Lower and higher refer here to up and down movements, not to lower or higher pitch. In other words, the lower string is nearest to the floor, while the upper string is farthest from it.) Downstrums are used when plucking an upper string followed immediately by a lower string. This is a logical use of the pick, although it can be argued that downstrums are usually louder than upstrums because they benefit from gravity, making the second half of the article problematic. You must put more force into the upstrums - and less to the downstrums, despite working against gravity. This provides the downbeats in the second half with the extra relative loudness they naturally get in music.
Remember to stay as relaxed as possible when doing this exercise and to not overdue the number of repetitions. Too many repetitions of a pattern such as this may cause repetitive stress injuries. Speed will come over time, not immediately, so practice it once every day that you practice, and make note of metronome speed over days, weeks, and months. Audio clips are provided at various speeds below the music. This exercise has five beats per measure, so make sure to count five beats of rest before you start, and continue counting to five as you play. Although the recorded examples make only one repetition, you can of course repeat it more times. NOTE: Sometimes the audio clips do not play correctly for some inexplicable reason. Dragging the time elapsed bar from the extreme left to the extreme right before playing usually solves this problem. Playing them a second time usually corrects the problem too.
I wish you the best of luck with this exercise and hope that you find it useful.
Jeff Anvinson, owner/operator of JLA Music
Click here to get a PDF version of this music. Please don't distribute this PDF by photocopying or posting it on the internet. You may print out one copy for your own use. If you know someone who wants a copy, simply refer them to this website. Please help me protect my intellectual property by respecting my rights.
Audio Clips
60 beats per minute
70 beats per minute
80 beats per minute
90 beats per minute
100 beats per minute
115 beats per minute
125 beats per minute
140 beats per minute
155 beats per minute
165 beats per minute
180 beats per minute
200 beats per minute
220 beats per minute
240 beats per minute
Website and most graphics are created inhouse by Jeff Anvinson, Owner/Operator of JLA Music
Some graphics are purchased from Can Stock Photo, used by permission, and are Copyright
© Can Stock Photo
JLA Music takes care not to infringe on anyone's rights. Please contact us at jla@jlamusic.com if you have questions.
Copyright 2023 © Jeffrey L Anvinson