


Strum Patterns for Guitar
(aka "Strum Rhythms")
(created specially for Tony)
There are probably an infinite number of rhythms you can use to strum a guitar. These are often called "strum patterns", or what I call "strum rhythms". I will show you in both notation and recorded examples, from simplest to more complex, several common strum patterns.
The strum patterns below are all in common time. In other words, they will work with any music that has four beats per measure. The vast majority of music is written in this time signature, so these strum rhythms will work with lots of tunes.
Before we get started, here's a quick explanation of the symbols.
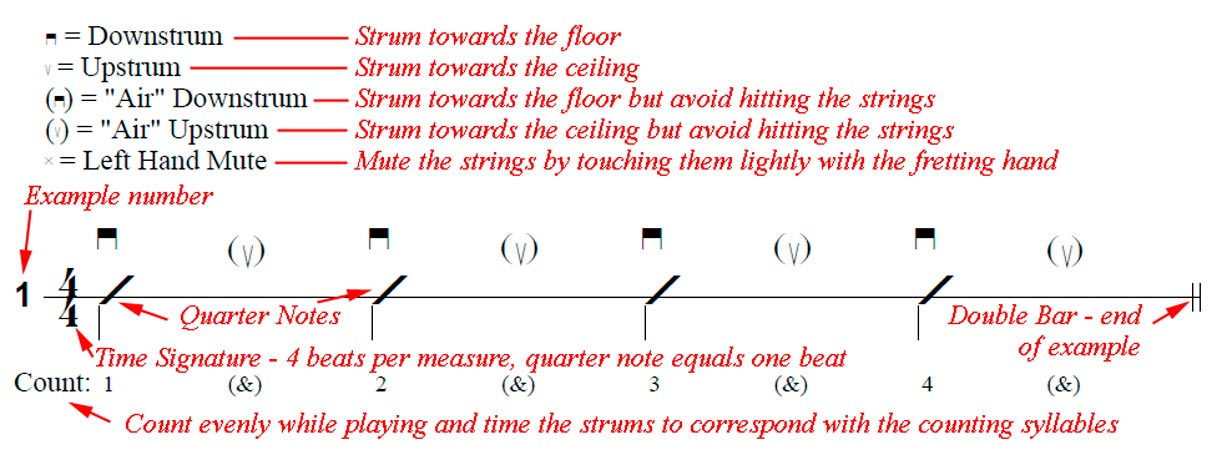
The concept of the "air" strums needs some explanation. An "air" strum is simply a downstrum or upstrum where the pick completely misses the strings - you are strumming "air" instead of the strings. Why would we do this? What if you have to strum the strings twice with two consecutive downstrums. You would have to reset the picking hand up above the strings after the first downstrum so that you could follow it with the second downstrum, right?. (Try strumming down twice without bringing your hand up in between. Unless you have figured out how to break the rules of physics, or you are "wind milling" in an extreme roundabout fashion, it is impossible, right?) In essence your right hand is strumming the strings down, then strumming air on the way back up - resetting your pick so that it can again strum the strings in a downward direction. When strums involve complex rhythms, it is best to strum down on the downbeats (when you tap your foot) and up on upbeats (when your foot goes up to prepare for a second tap of your foot). (Some rhythms are even more complicated than this simple example.)
If you watch well-trained guitar players, their strumming hand is often continually churning up and down in a steady rhythm, even though they may not always actually hit the strings every time the pick goes up and down. If the strumming hand keeps a steady rhythm, avoiding the strings when necessary - using "air" strums - it is usually easier to keep a steady, driving rhythm and maintain the normal accent that occurs on downbeats (when our foot taps the floor). If you follow the directions for the following examples carefully, using "air" strums as noted, although it may feel awkward at first, in the long run you will develop a strong and rhythmical strumming motion that will enable you to do very complex rhythms.
You may have to practice the harder examples very slowly and methodically at first till you get the hang of this important technique. It is especially difficult for beginners to "get this" so be persistent! It will get better if you practice slowly enough that you can accurately do the required up and down strums, with the requisite "air" strums. Don't rush it because you may only be practicing mistakes which will prevent you from improving. (You might want to read my article on practicing, found here.)
To practice these examples, I suggest that you pick a chord (perhaps one from this page) and strum it using the particular rhythm (pattern). For this web article, I use a different chord for each example. (Notice the chord symbol at the top left of each example. You may refer to the chord chart on this page if you are unfamiliar with these chords.)
NOTES: The sound clips for each example were recorded many years ago and are not perfect. I hope you can look past any imperfections. Perhaps I will take some time eventually and re-record them but I think they suffice for now. I refer to "air" upstrums as "ghost" strums a few times in the audio clips. The phrase "ghost strums" is synonymous with "air strums". Earlier in my teaching career I thought that "ghost strums" was a better phrase but I now think that "air strums" is clearer. It's amazing how aging clarifies some things. ;-)
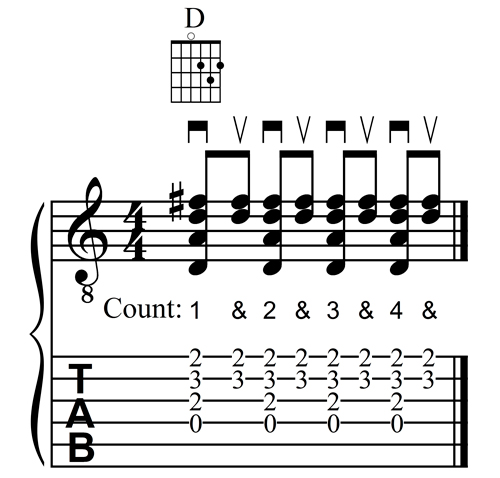
One more tip: When strumming down, strum only the strings that are used for the particular chord - for example, strum only the bottom five strings for a basic open position C chord. When strumming up, strum only the bottom two or three strings (the highest-pitched ones). This gives the music a better "rhythmic feel": The downbeats are louder and the upbeats are softer. This is how music normally sounds and helps propel it forward with a driving rhythm.
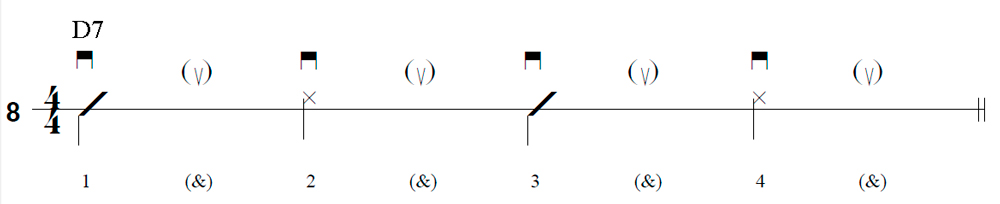
For example, when strumming an open position D chord, only the bottom four strings are usually strummed, while the top two are avoided. Therefore, when strumming down, strum the bottom four strings, but strum only the bottom two or three (the highest-pitched ones) on upstrums. The following example demonstrates this concept. Play the sound file to hear it.
Click here to get a pdf version of all of the following strum rhythms. Please don't distribute this pdf by photocopying or posting it on the internet. You may print out one copy for your own use. If you know someone who wants a copy, simply refer them to this website. Please help me protect my intellectual property by respecting my rights.
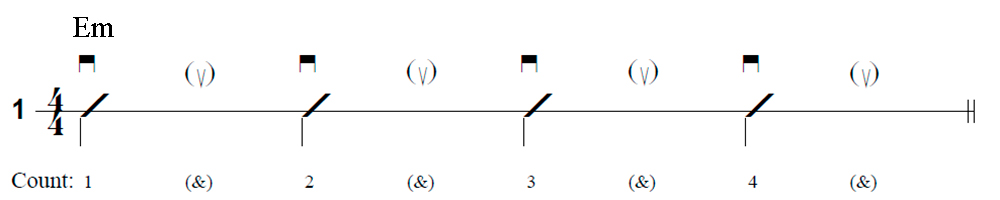
Strum Rhythm Number One
Strum Rhythm Number Two

Strum Rhythm Number Three

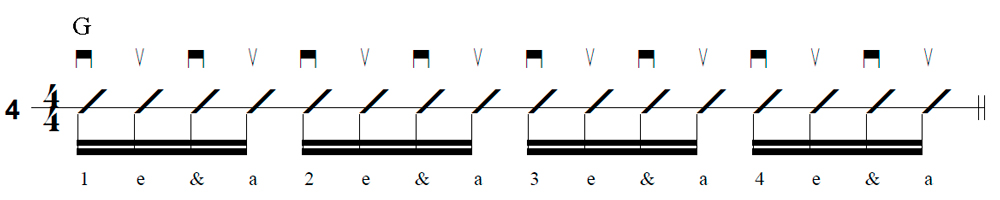
Strum Rhythm Number Four
Strum Rhythm Number Five

Strum Rhythm Number Six

Strum Rhythm Number Seven

Strum Rhythm Number Eight
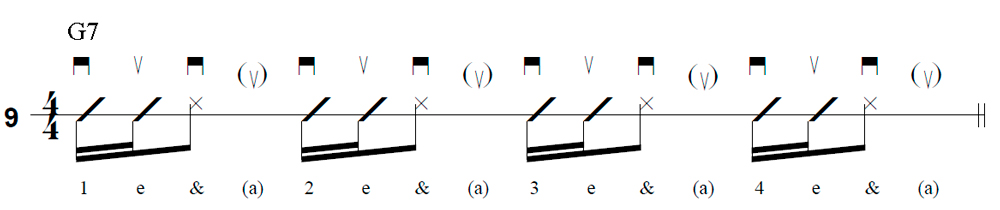
Strum Rhythm Number Nine
Strum Rhythm Number Ten

I hope that this page is helpful as you learn new and more complicated strum rhythms.
Jeff Anvinson, owner/operator of JLA Music
Website and most graphics are created inhouse by Jeff Anvinson, Owner/Operator of JLA Music
Some graphics are purchased from Can Stock Photo, used by permission, and are Copyright
© Can Stock Photo
JLA Music takes care not to infringe on anyone's rights. Please contact us at jla@jlamusic.com if you have questions.
Copyright 2025 © Jeff Anvinson, JLA Music